It is not only a fully functional graph visualization library, but also an explorer of data relationships.
!!!###!!!title=Create Instance——VisActor/VRender tutorial documents!!!###!!!!!!###!!!description=Similar to the DOM tree and React virtual node tree, VRender also draws based on a scene tree. VRender mounts this scene tree through layers, which are managed by the Stage. The Stage manages the lifecycle of the entire application, the position and size of views, and the logic for scene drawing and picking.As shown in the diagram below, a VRender application generally includes a `Stage`, which can have multiple layers (`Layer`) attached to it, and each layer can have multiple graphic elements attached to it.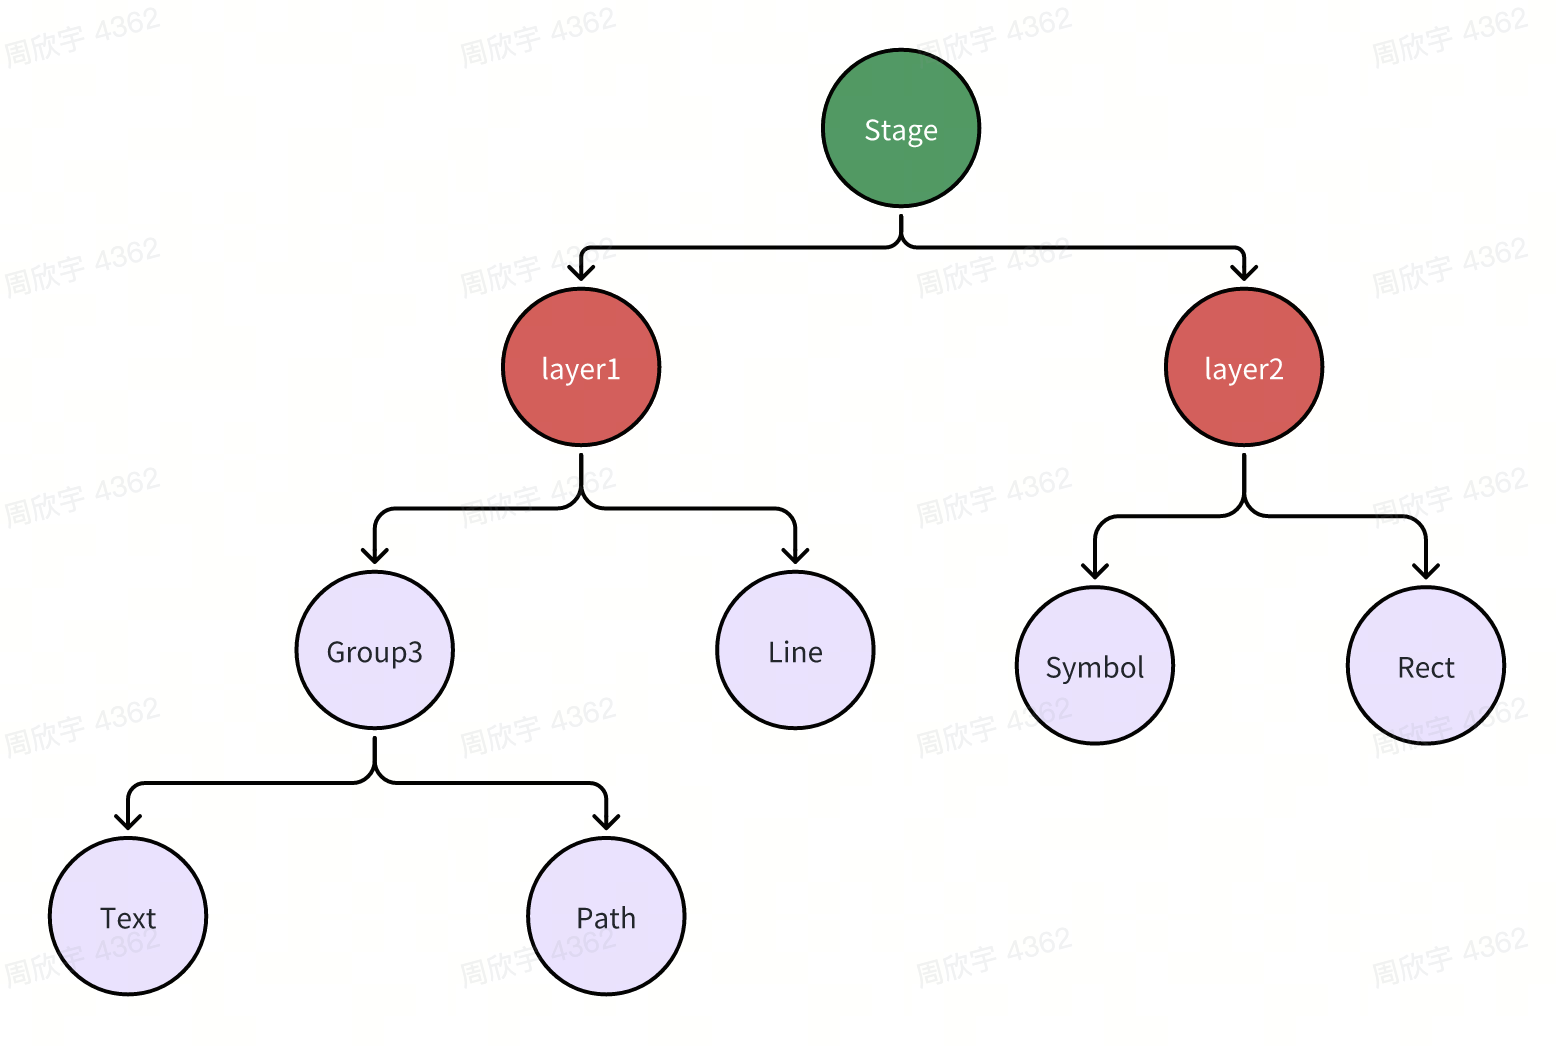!!!###!!!
Creating Instances
Similar to the DOM tree and React virtual node tree, VRender also draws based on a scene tree. VRender mounts this scene tree through layers, which are managed by the Stage. The Stage manages the lifecycle of the entire application, the position and size of views, and the logic for scene drawing and picking.
As shown in the diagram below, a VRender application generally includes a Stage, which can have multiple layers (Layer) attached to it, and each layer can have multiple graphic elements attached to it.
Creating a Stage
New code should create an environment-specific VRender App first, then create concrete views through app.createStage(). The older root-level new Stage(...) and createStage(...) APIs remain available for compatibility, but they should not be the default pattern for new browser, Node, mini-app, Lynx, or Harmony integrations.
When creating a Stage, an object is passed as a parameter. The most commonly used properties are as follows:
container: the mounting container, which needs to be a DOM element and is only available in the browser environment
canvas: the mounting canvas, which needs to be a Canvas element and is mutually exclusive with the container, can be used in different environments
width: the width of the canvas
height: the height of the canvas
autoRender: whether to automatically render; if set to true, there is no need to manually call the stage.render() method as it will render automatically
background: the background color of the canvas, defaulting to white
For the full description of App capabilities, shared App APIs, envParams boundaries, and platform usage notes, see App Capabilities and Usage.
For browser, Node, mini-app, Lynx, and other multi-platform integrations, prefer the app-scoped entry points such as createBrowserVRenderApp() and createLynxVRenderApp(), then create stages with app.createStage(). The app owns application-level resources such as renderers, pickers, plugins, and environment contributions. Treat it as a page-level, container-level, or host Canvas-view-level instance instead of creating and releasing it during ordinary UI switches.
App-level envParams should only contain environment-level capabilities, such as the node-canvas package in Node or a Lynx runtime / canvasFactory that is valid for the whole app scope. The concrete Canvas view canvas name/id, width, height, and dpr belong to Stage or Layer creation and should be passed through app.createStage({ canvas, width, height, dpr }) or the layer creation path. If an integration puts a canvasFactory-like capability on the app, that integration must ensure it is globally valid for all VRender users sharing the same app.
When multiple upper-level libraries on the same page need VRender, such as one VChart chart and one VTable table, use acquireSharedVRenderApp() to acquire a shared app by env + key. The first acquirer creates the app with its app-level parameters, and later acquirers with the same env + key reuse it. VRender does not merge or validate later envParams, so the integration layer must ensure the same key means the same global environment capabilities. Each user should still create and release its own Stage:
For tab switches, filter changes, scene switches, or component-page switches, prefer reusing the existing app/stage and only clearing the previous graphics, stopping old animations/timers, and rebuilding or updating the scenegraph:
stage.defaultLayer.removeAllChild(true);
// rebuild or update scenegraph
stage.render();
If the Stage really needs to be replaced, keep the same app and recreate the Stage only on a low-frequency lifecycle boundary. Release the app only when the page, container, or host Canvas view is fully unmounted:
stage.release();
app.release();
During the Lynx smoke investigation, the old test path coupled app recreation, Canvas-view binding, scenegraph cleanup, and redraw. Repeated switches once caused visible simulator stutter, while the current model, where concrete Canvas parameters are moved from app envParams to Stage creation, no longer shows continuous degradation from recreating the app alone. This points to the previous Canvas/native-view operation mix in the test path rather than an inherent VRender app-core leak. For Lynx and similar multi-platform hosts, still reuse a singleton or page-scoped app and avoid putting app.release() on high-frequency UI switching paths.
Harmony Integration and Offline Verification
Harmony integrations should also use createHarmonyVRenderApp() or acquireSharedVRenderApp({ env: 'harmony' }) to create the app. App-level envParams should only contain capabilities that are valid for the whole app scope, such as pixelRatio, a canvasFactory that can create host Canvas objects for any Stage canvas name/id, or an equivalent host runtime. The concrete Canvas name/id, width, height, and dpr still belong to Stage creation:
Without a Harmony device, you can still verify the following:
Run the VRender Harmony env/window unit tests, related package compile, and type checks to validate the runtime contract for app-scoped entry points, Stage-level Canvas creation, event normalization, and SVG fallback.
Use the DevEco Studio / HarmonyOS SDK simulator or preview environment to verify that the host Canvas adapter can return a usable CanvasRenderingContext2D, and that touch/click events can be forwarded to stage.window.dispatchEvent().
Use a mock canvasFactory to verify that upper-level libraries such as VChart and VTable create their own Canvas from Stage parameters instead of putting concrete canvas ids/sizes into a shared app's envParams.
Without a real device, you cannot fully prove real-device GPU/Canvas bridge performance, font and image loading differences, long-running touch interaction stability, multi-layer Canvas composition, or low-end device memory behavior. Those still require a Harmony device, or at least an official simulator, for smoke verification.
The Harmony host needs to convert touch events into VRender-recognizable events and forward them to the active Stage:
stage.window.dispatchEvent({
  type: 'touchstart',
  changedTouches: [{ x, y, clientX: x, clientY: y }]
});
The VRender Harmony window contribution normalizes target/currentTarget to the native canvas and fills top-level x/y/offsetX/offsetY/clientX/clientY, but the host still needs to provide coordinates in the current Canvas coordinate system.
All the parameters that the stage supports are as follows:
interface IStageParams {
  // Viewport width and height
  viewBox: IBoundsLike;
  // Total width and height
  width: number;
  height: number;
  dpr: number;
  // Stage background
  background: string | IColor;
  // External canvas
  canvas: string | HTMLCanvasElement;
  // Canvas container, if canvas is not passed, a canvas will be created in the container
  container: string | HTMLElement;
  // Whether it is a controlled canvas; if not, it will not perform resize operations or modify the canvas style
  canvasControled: boolean;
  title: string;
  // Whether to enable automatic rendering
  autoRender: boolean;
  // Whether to enable layout support
  enableLayout: boolean;
  // Whether to disable dirty bounds detection
  disableDirtyBounds: boolean;
  // Whether to support interactiveLayer, default is true
  interactiveLayer: boolean;
  // Whether to support HTML attributes
  enableHtmlAttribute: string | boolean | HTMLElement;
  // Whether to support react-dom (pass in ReactDOM)
  ReactDOM: any;
  // Whether to support scrollbars
  enableScroll: boolean;
  // Whether to support poptip
  poptip: boolean;
  // Hook function before rendering
  beforeRender: (stage: IStage) => void;
  // Hook function after rendering
  afterRender: (stage: IStage) => void;
  // Render style
  renderStyle?: string;
  // Custom ticker
  ticker?: ITicker;
  // List of enabled plugins
  pluginList?: string[];
  // Optimization configuration
  optimize?: IOptimizeType;
  /**
   * Event system related configuration
   */
  event?: EventConfig;

  /**
   * @since 0.17.15
   * Whether to support touch events; if not supported, touch events will not be listened to
   */
  supportsTouchEvents?: boolean;

  /**
   * @since 0.17.15
   * Whether to support pointer events; if not supported, mouse events will be listened to
   */
  supportsPointerEvents?: boolean;

  context?: IStageCreateContext;
}
Creating a Layer
By default, Stage will create a layer stage.defaultLayer, which is a container used to mount graphic elements. A Stage can contain any number of layers. In VChart, we often use one layer as the main layer and create another layer to store tooltip elements and components.
To create a layer, you can use the stage.createLayer() method.
VRender provides many graphic elements. For details on graphic elements, you can refer to the Graphic section. The creation of graphic elements is similar to Stage, providing two ways to create them. Taking a rectangle element as an example:


