It is not only a fully functional graph visualization library, but also an explorer of data relationships.
!!!###!!!title=sheet getting started——VisActor/VTable tutorial documents!!!###!!!!!!###!!!description=This chapter introduces how to quickly get started with the VTable-Sheet component, including installation, basic configuration, and creating your first spreadsheet.!!!###!!!
Getting Started
This chapter introduces how to quickly get started with the VTable-Sheet component, including installation, basic configuration, and creating your first spreadsheet.
Installation
Install the VTable-Sheet component using npm or yarn:
# Using npmnpm install @visactor/vtable-sheet
# Using yarnyarn add @visactor/vtable-sheet
Basic Usage
Importing the Component
// ES module importimport { VTableSheet } from'@visactor/vtable-sheet';
// Or using CommonJSconst { VTableSheet } = require('@visactor/vtable-sheet');
cdn import
If only the vtable-sheet umd package is imported, the underlying vrender environment restriction cannot work properly! ! !
Both the vrender and vtable umd packages need to be imported.
The vtable umd package cannot also use the unpkg platform, the user needs to fork the vtable source code first, and then package a vtable umd package themselves! ! !
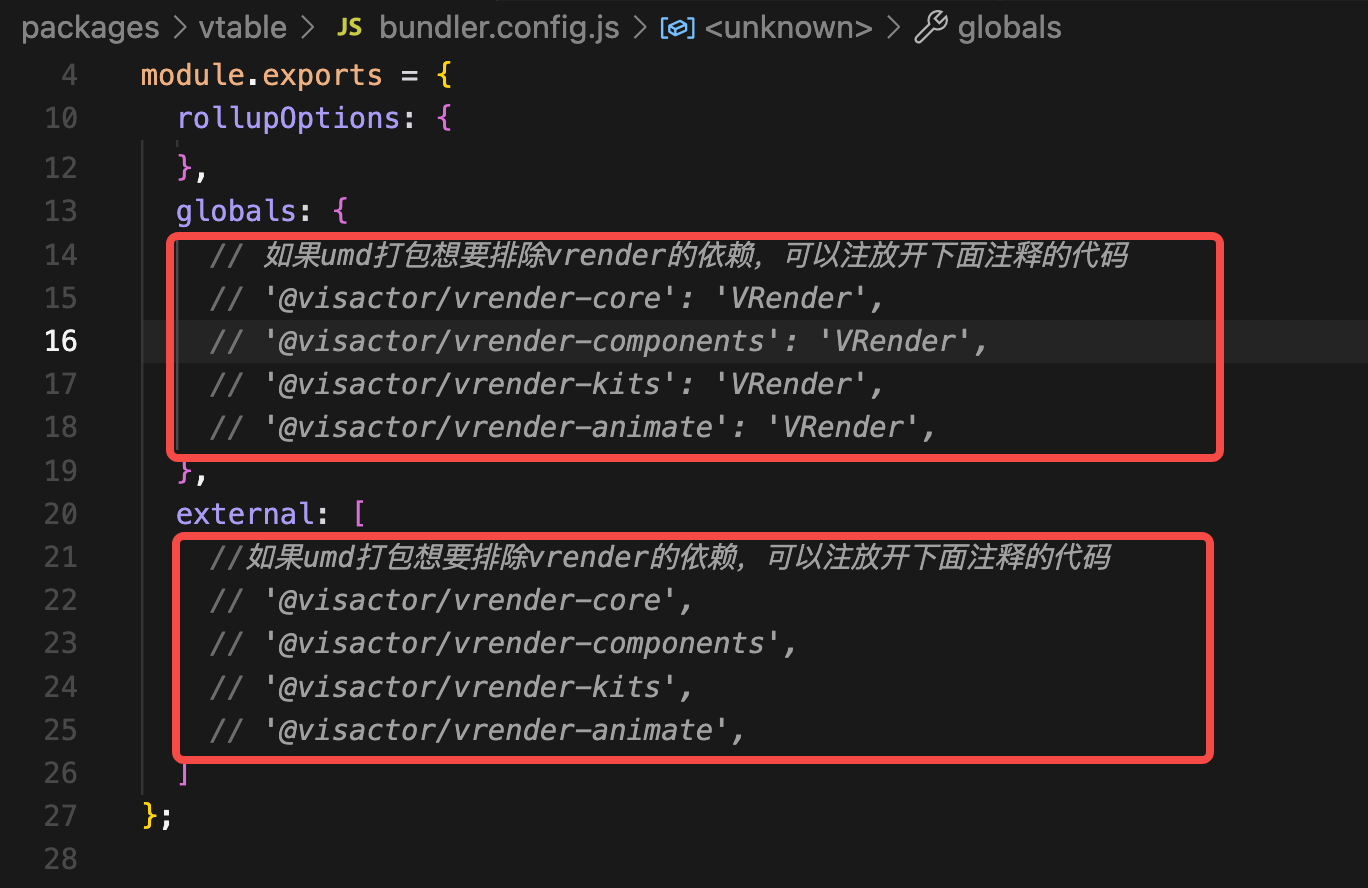
Before packaging, it is necessary to release the commented code about vrender in the packaging configuration. Run the command cd packages/vtable && rushx build to get the vtable.js file in the dist directory.
// Create a table instanceconst sheetInstance = new VTableSheet(document.getElementById('container'), {
showFormulaBar: true, // Show formula barshowSheetTab: true, // Show sheet tabs at the bottomdefaultRowHeight: 25, // Default row heightdefaultColWidth: 100, // Default column widthsheets: [
{
sheetKey: 'sheet1', // Unique sheet identifiersheetTitle: 'Sheet 1', // Display name for the sheetcolumns: [ // Column definitions { title: 'Name', width: 100 },
{ title: 'Age', width: 80 },
{ title: 'Department', width: 120 }
],
data: [ // Table data ['John', 28, 'Engineering'],
['Lisa', 32, 'Marketing'],
['Mike', 25, 'HR']
],
active: true// Set as the currently active sheet }
]
});
Configuration Options
The VTableSheet component supports a rich set of configuration options:
Top-level Configuration
Option
Type
Default
Description
showFormulaBar
boolean
true
Whether to display the formula bar
showSheetTab
boolean
true
Whether to display sheet tabs at the bottom
defaultRowHeight
number
25
Default row height
defaultColWidth
number
100
Default column width
sheets
ISheetDefine[]
[]
Array of sheet definitions
theme
ITheme
-
Table theme configuration
VTablePluginModules
Array
[]
Plugin module configuration. You can configure VTable-supported plugins for VTableSheet or disable some built-in plugins. For plugin configuration options, refer to VTable-Plugins
mainMenu
IMainMenu
-
Main menu configuration
undoRedo
{ show?: boolean }
{ show: true }
Undo/redo UI configuration
dragOrder
Object
-
Drag column order and row order configuration, if configured in ISheetDefine, this configuration will be ignored
Worksheet Configuration (ISheetDefine)
Option
Type
Default
Description
sheetKey
string
-
Unique worksheet identifier
sheetTitle
string
-
Display name for the worksheet
columns
IColumnDefine[]
[]
Column definition array. If columns are not configured, the actual titles are in the data. You can use firstRowAsHeader to use the first row as the header. If you don't want the first row as the header, you can set showHeader to false.
data
any[][]
[]
Table data, currently only supports two-dimensional arrays, not JSON format data
active
boolean
false
Whether this is the currently active worksheet
showHeader
boolean
true
Whether to display the header
firstRowAsHeader
boolean
false
Whether to use the first row as the header
filter
boolean | object
false
Whether to enable filtering
columnCount
number
-
Number of columns (used when columns are not specified)
rowCount
number
-
Number of rows
frozenRowCount
number
0
Number of frozen rows
frozenColCount
number
0
Number of frozen columns
cellMerge
ICellMerge[]
[]
Cell merge configuration
dragOrder
Object
-
Drag column order and row order configuration
columnWidthConfig
Object[]
[]
Column width configuration
rowHeightConfig
Object[]
[]
Row height configuration
theme
IThemeDefine
-
Worksheet theme configuration
Note:
The columns field is optional. When columns are set, the table will use them as the header with all the features of a VTable header.
If columns are not set or are an empty array, the table will have an empty header row. If you don't want to show this empty header, set showHeader to false, and only the data will be displayed as the table body.
If you want to use the first row of data as the header, you can set firstRowAsHeader. You can also use the setFirstRowAsHeader method.
Instance Methods
The VTableSheet instance provides the following common methods:
Method
Parameters
Return Value
Description
getActiveSheet
-
WorkSheet
Get the currently active worksheet
getSheetByKey
sheetKey: string
WorkSheet
Get a worksheet by its key
addSheet
sheetDefine: ISheetDefine
WorkSheet
Add a new worksheet
removeSheet
sheetKey: string
boolean
Remove the specified worksheet
getFilterManager
-
FilterManager
Get the filter manager
getFormulaManager
-
FormulaManager
Get the formula manager
getWorkbookHistoryManager
-
WorkbookHistoryManager
Get the workbook history manager
undo
-
void
Undo the latest workbook transaction
redo
-
void
Redo the latest workbook transaction
startHistoryTransaction
-
void
Start a workbook-level history transaction
endHistoryTransaction
-
void
End the current workbook-level history transaction
saveToConfig
-
IVTableSheetOptions
Save the current state as a configuration object
exportSheetToFile
fileType: 'csv' | 'xlsx'
void
Export the current worksheet to a file
importFileToSheet
-
void
Import a file to the current worksheet
release
-
void
Destroy the table instance
Simple Example
Below is a complete HTML example showing how to create and use the VTable-Sheet component:
This basic example shows how to create a simple table. In subsequent chapters, we will delve into more advanced features and how to use them.